Making a house in Wings3D with the help of InkScape
Introduction
The goal of this tutorial is to 3d model a house that also has an interior.
You will need:
- Wings 3D 2.3 (the latest SVG path plugin is required) to model the house
- InkScape to create the floor plan.
InkScape Plan
For this tutorial you should create a floor plan of the interior in inkscape.

Some things to consider when making the floor plan:
- Make sure the floor plan is all one object, walls, windows and doors should be merged to one object with Path > Union.
- Doors and windows are represented as indentations in the wall.
- The color of the shape does not matter and can be changed in Wings later.
Save the shape as a SVG file named floor-plan.svg for import into Wings3D
Importing into Wings

Start Wings3D, this tutorial assumes version 2.3
In the File menu, use Import > SVG Paths.
Push Space to reset the selection mode.

Change to body selection.
Click on the imported shape.with RMB and choose Rotate LMB, choose X LMB, press Tab, enter -90 and press OK.
Create the floor
Push Space to reset the selection mode.
Create a cube.


Click LMB on the top face to select it. Use RMB and choose Move LMB, choose Normal LMB, drag mouse until the cube becomes a thin plate, however keep some space to be able to select the sides for the next step, and then click LMB to complete the change.
Click on body selection to select the entire thin plate, from the main menu, Tools > Put on ground.
Push Space to reset the selection mode.
Click LMB on the floor plan shape, from the main menu, Tools > Put on ground.
Push Space to reset the selection mode.

Change to face selection mode.
For each side of the plate do the following.
Click RMB on a face, choose Move LMB, choose Normal LMB, and drag until the edge of the floor meets the floor plan.

Do the same for the other 3 edges.

Bringing up the walls
Push Space to reset the selection mode.
Change to face selection mode
For the next steps, we want to make three segments of the wall that will divide by the window frame and door frames.
Select LMB a face on the top of the floor plan shape.

And then from main menu, choose Select, choose Similar Normals..., this should select all segments of the top of the wall.

Click RMB, choose Move LMB, choose Normal LMB, then drag until the walls are a desired height where the bottom of the window frame will be. Click LMB to complete the change.

Click RMB, choose Extrude LMB, choose Normal LMB, then drag until the walls are a desired height where the door frame will be. Click LMB to complete the change.

Click RMB, choose Extrude LMB, choose Normal LMB, then drag until the wall are a desired height to the top of the ceiling. Click LMB to complete the change.

Creating the windows
Push Space to reset the selection mode.
To create the windows, for each window, two faces need to be selected, the face of the window from the exterior, and the face of the window from the interior.

Rotate the camera to find the other side of the window. Rotating the view is accomplished with MMB. Click MMB again to complete the view rotation.

After selecting the two sides of the window with LMB, click RMB and choose Bridge LMB. The window should appear.

Repeat for each window.

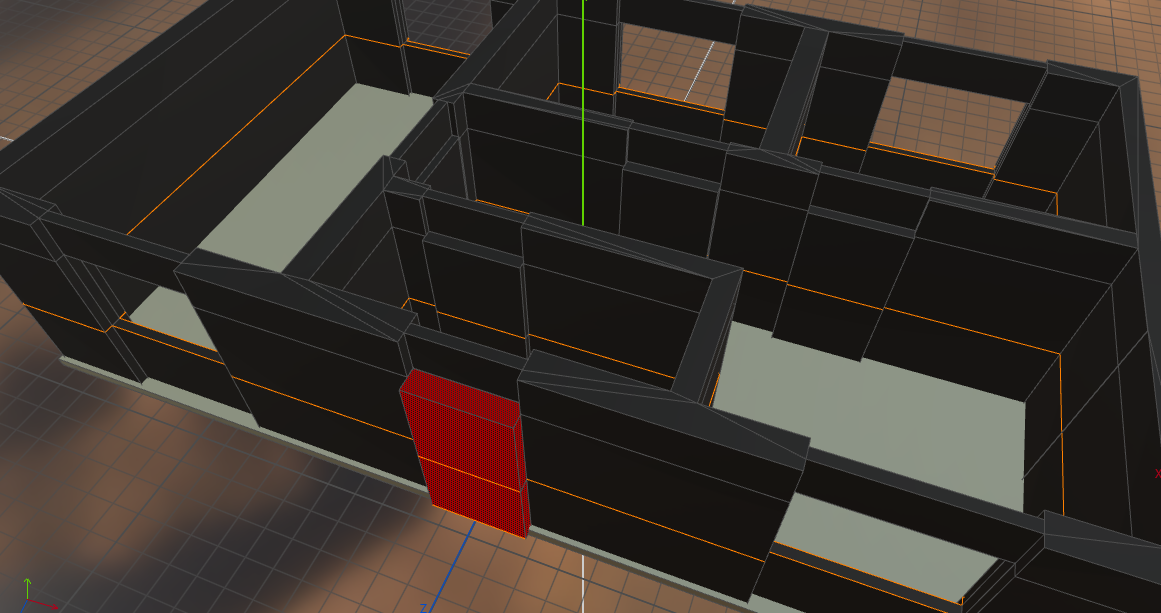
Creating the doors
Push Space to reset the selection mode.
Similar to creating the windows, to create the doors, for each door, four faces need to be selected, each side having two faces to select instead of one.

Before we select the other side, let's make a shape that fits the door.
Click RMB, choose Shell Extrude LMB, choose Normal LMB. Select body selection mode, this should select the whole door. Click RMB, choose Move, choose Y LMB, drag the door somewhere temporary until it will be used later.

Push Space to reset the selection mode.
Select the two faces of the door again

Rotate the camera [m:MMB] to select the other side.

After selecting the two sides of the door with LMB, click RMB and choose Bridge LMB. The door should appear.

Repeat for each door.

Press Ctrl➕A to select all the shapes. From the main menu, choose Tools, choose Put on Ground.

This will bring all the doors onto the ground plane and at the same height but may not be exactly the right position to fit back into the door frames.
Push Space to reset the selection mode.
Change to body selection mode.
Select all the doors with LMB.

To adjust a bit the Y position of the doors, click RMB, choose Move LMB, choose Y LMB. Drag until the doors are better positioned. Click LMB to complete the change.


The next step assumes your doors face either directly to the X axis or Z axis.
Push Space to reset the selection mode.
Change to body selection mode.
Select a door to adjust the thickness of.
Click RMB, choose Absolute Commands LMB, choose Scale LMB, enter a value for the X or Z axis depending on which way the door is facing.

Repeat for each door.

All doors now have the same thickness and just need to be placed back into the door frames.
For each door:
Push Space to reset the selection mode.
Change to body selection mode.
Click RMB, choose Move RMB (note this time the right mouse button), click on one side of the door to set the axis to move along, a line or arrow should appear, click RMB to confirm pick, then drag the door until it fits into the door frame.

Repeat for each door.
After adjusting all the doors, we can select all the door and change the color.
Push Space to reset the selection mode.
Change to body selection mode.
Select all the doors, from the main menu, choose Tools, choose Palette, click on a color, close the palette.

Make a ceiling
We can now make a ceiling for our house.
Push Space to reset the selection mode.
Change to body selection mode.

Click RMB, choose Duplicate LMB, choose Y LMB, drag the new ceiling towards the top of the walls. Click LMB to complete the change.

Push Space to reset the selection mode.
Position the camera MMB to view the new ceiling from the top.

Change to edge selection mode.
Click two opposite edges of the top of the ceiling.

Press G, more edges that form a perpedicular loop across the ceiling should be selected. Press C to create a new edge loop.

Push Space to reset the selection mode.
Select only the edge in the middle on the top of the ceiling.
Click RMB, choose Move LMB, choose Y LMB, drag until the roof is a desired height. Click LMB to complete the change.

Push Space to reset the selection mode.
Select the two faces of the roof.

Click RMB, choose Shell Extrude LMB, choose Normal LMB, drag until the roof has some thickness, click LMB to complete the change.

Rotate MMB around the house, selecting LMB the faces around the edge of the roof.

Click RMB, choose Move LMB, choose Normal LMB, drag to "pop out" the roof over the house. Click LMB to complete the change.

You now have the basics of a house made in Wings3D, made from floor plans created in InkScape, and ready to be customized further.
